Step-by-Step Guide: Configuring PostgreSQL HA with Patroni

In today's world, many modern applications use PostgreSQL to store their data efficiently and securely. PostgreSQL is special because it's open-source, which means it's flexible and customizable, unlike traditional database systems like ORACLE and DB2.
Ensuring High Availability (HA) for your PostgreSQL databases is crucial for minimizing downtime and maintaining seamless application performance. This comprehensive guide walks you through setting up PostgreSQL HA using Patroni, an open-source tool designed for PostgreSQL cluster management.
What is High Availability and why it is required?
High Availability, often abbreviated as HA, plays a critical role in ensuring uninterrupted operation of your applications relying on PostgreSQL. Picture this scenario: your application is up and running smoothly, but suddenly, the database server crashes or crucial database files are accidentally deleted. The result? Complete downtime for your application until the database is fully recovered.
To avoid such scenarios in production we need a setup with two or more in sync copies of the database and a mechanism to automatically switch from failed database to running database. This setup is referred as HA setup. The ultimate aim is to avoid single point of failure (SPOF) for the whole system.
Why to use Patroni?
There are different solutions available for setting up PostgreSQL with HA. You can find full list of replication solutions.
- PostgreSQL Automatic Failover(PAF)
- Replication Manager (Repmgr)
- Patroni
You can compare these solutions based on different factors like Failure detection, Failure recovery, Automatic Failover, Alert Management, Ease of Setup and Maintenance. Considering all these points Patroni is best candidate to choose for HA and DR setup. Also if you know little bit of Python you can easily read the code and change it according to your needs. Patroni also provides REST APIs to automate things on top of the existing functionalities.
Patroni Overview
Patroni is open source HA template for PostgreSQL written in Python which can be deployed easily on Kubernetes or VMs. It can be integrated with ETCD, Consul or Zookeeper as consensus store.
It is developed and maintained by Zalando, you can find source code on github.
Why Choose Patroni for PostgreSQL High Availability?
While several solutions exist for achieving PostgreSQL HA, Patroni stands out due to its robust features and flexibility:
- Automatic Failover: Patroni ensures that if the primary node fails, a replica is promoted automatically, minimizing downtime.
- Dynamic Configuration: It manages PostgreSQL configurations dynamically, allowing seamless scaling and adjustments.
- Integration with Distributed Configuration Stores (DCS): Patroni supports ETCD, Consul, and Zookeeper, providing reliable distributed consensus.
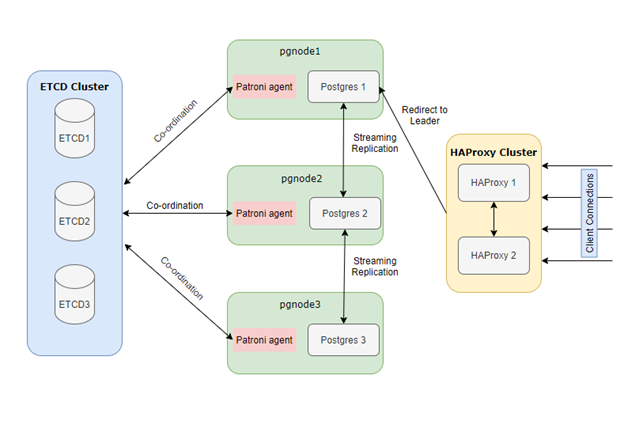
Solution Architecture Overview
The architecture comprises multiple components working in unison to ensure high availability:
- Distributed Consensus Store (DCS): Utilizing ETCD, Consul, or Zookeeper to maintain cluster state and leader election.
- Load Balancer: Implementing HAProxy to direct client connections to the current primary node.
- PostgreSQL Nodes Managed by Patroni: A cluster of PostgreSQL instances where Patroni oversees replication and failover.
This setup ensures that the database cluster remains resilient, with automatic failover and minimal downtime.
Below diagram shows architecture of complete Solution with all components. You can tweak this according to your needs and limitations on hardware. Here we have used 8 VMs to avoid Single Point Of Failure and achieve High Availability on Postgres.
Components used
In the realm of PostgreSQL High Availability, Patroni relies on a set of key components and software tools to ensure seamless performance:
- Distributed Consensus Store (DCS): Patroni requires a DCS system, such as ETCD, Consul, or Zookeeper, to store vital configuration data and real-time status information of the nodes. We will use odd number (>1) of servers here we are using 3 nodes with minimum configuration.
- Load Balancer (e.g., HAProxy): A crucial element in the setup is a load balancer, like HAProxy. It plays a pivotal role in distributing incoming traffic across the PostgreSQL instances, ensuring all traffic should go to only master node. We will use two machines with minimum configuration - you can also utilize 1 HAProxy server but in this case we need to compromise on single point of failure.
- PostgreSQL Version 9.5 and Above: Patroni seamlessly integrates with PostgreSQL versions 9.5 and higher, providing advanced features and reliability enhancements. This compatibility ensures that you can leverage the latest capabilities of PostgreSQL while maintaining high availability. Hardware configuration for these nodes is dependent on the database size. For setting up you can start with 2 cores and 8GB RAM.
Deploying three PostgreSQL servers instead of two adds an extra layer of protection, safeguarding against multi-node failures and bolstering system reliability.
Hardware used in the Solution:
|
Component |
Number of VMs |
Configuration |
Comment |
|
ETCD Cluster(DCS) |
3 |
1 Cores/2GB |
For DCS you need to choose odd number of machines |
|
HAProxy |
2 |
2 Core/4GB |
Load Balancer |
|
Postgres + Patroni |
3 |
2 Cores/8GB |
PG nodes |
VM Configuration above is given as a reference you can tweak this according to your needs.
Let's dive in by installing Production grade system. Below is the /etc/hosts file used in the setup.
#etcd hosts
192.168.56.201 etcd1.bootvar.com etcd1
192.168.56.202 etcd2.bootvar.com etcd2
192.168.56.203 etcd3.bootvar.com etcd3

#postgres hosts
192.168.56.204 pgdb1.bootvar.com pgdb1
192.168.56.205 pgdb2.bootvar.com pgdb2
192.168.56.206 pgdb3.bootvar.com pgdb3

#haproxy hosts
192.168.56.207 haproxy1.bootvar.com haproxy1
192.168.56.208 haproxy2.bootvar.com haproxy2
/etc/hosts
ETCD Installation and Configuration (etcd1, etcd2, etcd3)
ETCD is a distributed key-value store used by Patroni to manage cluster state and facilitate leader election among replicas through consensus. Here are the steps to install ETCD on three nodes for optimal performance and reliability.
Download the installation tar file for your system architecture from the official ETCD GitHub releases page.
wget https://github.com/etcd-io/etcd/releases/download/v3.5.0/etcd-v3.5.0-linux-amd64.tar.gzAfter downloading the tar file, unzip it and copy the binaries to the /usr/bin directory for easy access and execution.
gtar –xvf etcd-v3.5.0-linux-amd64.tar.gz
cd etcd-v3.5.0-linux-amd64/
cp etcd etcdctl etcdutl /usr/bin
Ensure that /usr/bin is included in your system's PATH variable. You can run the following commands to verify if ETCD is installed correctly:
[root@etcd1 ~]# etcd --version
etcd Version: 3.5.0
Git SHA: 946a5a6f2
Go Version: go1.16.3
Go OS/Arch: linux/amd64
Repeat the same steps on all three ETCD hosts to ensure that ETCD is installed and configured consistently across the cluster.
Create a dedicated user and group for running ETCD binaries to enhance security. You can do this by running the following commands:
groupadd --system etcd
useradd -s /bin/bash --system -g etcd etcd
This will create a user and group named etcd without a login shell and home directory, ensuring that ETCD runs securely with limited permissions.
Create two directories, one for storing ETCD data and another for configuration files. You can do this with the following commands:
sudo mkdir -p /var/lib/etcd/
sudo mkdir /etc/etcd
sudo chown -R etcd:etcd /var/lib/etcd/ /etc/etcd/etc/etcdwill hold the configuration files./var/lib/etcdwill be used for storing the ETCD data.
Login using etcd user and create .bash_profile file with below content
export ETCD_NAME=`hostname -s`
export ETCD_HOST_IP=`hostname -i`
Create Service etcd in /etc/systemd/system/etcd.service, replace IP addresses with your corresponding machine IPs
[Unit]
Description=etcd
Documentation=https://github.com/etcd-io/etcd

[Service]
Type=notify
User=etcd
WorkingDirectory=/var/lib/etcd/
EnvironmentFile=-/etc/etcd/etcd.conf
ExecStart=/usr/bin/etcd \\
  --name ${ETCD_NAME} \\
  --data-dir=/var/lib/etcd \\
  --initial-advertise-peer-urls http://${ETCD_HOST_IP}:2380 \\
  --listen-peer-urls http://${ETCD_HOST_IP}:2380 \\
  --listen-client-urls http://${ETCD_HOST_IP}:2379,http://127.0.0.1:2379 \\
  --advertise-client-urls http://${ETCD_HOST_IP}:2379 \\
  --initial-cluster-token etcd-cluster-0 \\
  --initial-cluster etcd1=http://192.168.56.201:2380,etcd2=http://192.168.56.202:2380,etcd3=http://192.168.56.203:2380 \\
  --initial-cluster-state new \

[Install]
WantedBy=multi-user.target
/etc/systemd/system/etcd.service
Once Service created enable the service and start it on all three servers
sudo systemctl daemon-reload
sudo systemctl enable etcd
sudo systemctl start etcd
You can check cluster working by issuing following commands:
[root@etcd1 ~]# etcdctl member list --write-out=table
+------------------+---------+-------+----------------------------+----------------------------+------------+
|        ID        | STATUS  | NAME  |         PEER ADDRS         |        CLIENT ADDRS        | IS LEARNER |
+------------------+---------+-------+----------------------------+----------------------------+------------+
| a79bc423e9248ab8 | started | etcd2 | http://192.168.56.202:2380 | http://192.168.56.202:2379 |      false |
| b6820e5fa6807659 | started | etcd3 | http://192.168.56.203:2380 | http://192.168.56.203:2379 |      false |
| b82998c4f9249433 | started | etcd1 | http://192.168.56.201:2380 | http://192.168.56.201:2379 |      false |
+------------------+---------+-------+----------------------------+----------------------------+------------+
To check leader you can check endpoint status:
etcdctl endpoint status --write-out=table --endpoints=etcd1:2379,etcd2:2379,etcd3:2379Note: By default etcd does not support v2 API, in case patroni fails to start with the api error, add --enable-v2 flag in etcd service
Patroni and Postgres Installation(pgdb1, pgdb2, pgdb3)
Below script can be used to install Postgres on Debian System (Ubuntu) - this will install latest postgresql version for Debian. For different flavors you can find installation instructions on https://www.postgresql.org/
sudo sh -c 'echo "deb https://apt.postgresql.org/pub/repos/apt $(lsb_release -cs)-pgdg main" > /etc/apt/sources.list.d/pgdg.list'
wget --quiet -O - https://www.postgresql.org/media/keys/ACCC4CF8.asc | sudo apt-key add -
sudo apt-get update
sudo apt-get -y install postgresql
Install Patroni service using dnf
dnf install patroniYou need to install extra package required for connecting to etcd:
pip3 install python-etcdEnable Patroni service - which will make sure to start patroni on every reboot of the server:
systemctl enable patroniCreate configuration file and required directories for patroni:
mkdir -p /etc/patroni/logs/ #directory to store logs
chmod 777 /etc/patroni/logs
touch /etc/patroni/patroni.yml
Create config file for patroni as below (/etc/patroni/patroni.yml):
scope: bootvar_cluster
name: pgdb1

log:
  traceback_level: INFO
  level: INFO
  dir: /etc/patroni/logs/
  file_num: 5

restapi:
  listen: 0.0.0.0:8008
  connect_address: 192.168.56.201:8008

etcd:
  protocol: http
  hosts: 192.168.56.201:2379,192.168.56.203:2379,192.168.56.203:2379

bootstrap:
  dcs:
    ttl: 30
    loop_wait: 10
    retry_timeout : 10
    maximum_lag_on_failover: 1048576
    postgresql:
      use_pg_rewind: true
      use_slots: true
      parameters:
        wal_keep_segments: 100
        #add other postgres DB parameters to start with

  initdb:
  - encoding: UTF8
  - data-checksums

  pg_hba:
  - host replication replicator 0.0.0.0/0 md5
  - host all all 0.0.0.0/0 md5

postgresql:
  listen: 192.168.56.204:5432
  connect_address: 192.168.56.204:5432
  data_dir: /var/lib/pgsql/bootvar/pgdb1/data
  bin_dir: /usr/pgsql-12/bin
  authentication:
    replication:
      username: replicator
      password: replicator
    superuser:
      username: postgres
      password: postgres
/etc/patroni/patroni.yml
Start Patroni service
service patroni startRepeat same procedure on all three nodes, for any issues you can set log.level and log.traceback_level to DEBUG
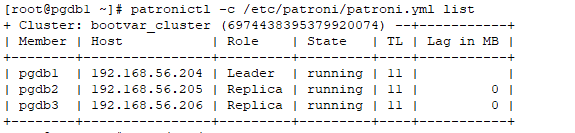
Once all nodes are up and running you can check status of patroni cluster using patronictl utility.
patronictl -c /etc/patroni/patroni.yml list
+ Cluster: bootvar_cluster (6974438395379920074) --+-----------+
| Member | Host           | Role    | State   | TL | Lag in MB |
+--------+----------------+---------+---------+----+-----------+
| pgdb1  | 192.168.56.204 | Leader  | running | 10 |           |
| pgdb2  | 192.168.56.205 | Replica | running | 10 |         0 |
| pgdb3  | 192.168.56.206 | Replica | running | 10 |         0 |
+--------+----------------+---------+---------+----+-----------+
If you are not familiar with patronictl, check our guide on patroni commands.
 Suhas Adhav
Now patroni cluster is ready to use, you can start playing around and do some replication and failover tests.
After this we need to setup load balancer to point it to active (Leader) Postgres database. For this you need two HAProxy servers or if you are setting this on cloud you can use load balancers provided by cloud provider.
Install load balancer (HAProxy - haproxy1, haproxy2)
HAProxy distributes traffic to the active PostgreSQL node.
Install HAProxy on both servers:
apt install haproxyConfigure haproxy.cfg file to redirect all traffic to active postgres leader.
global
    maxconn 100

defaults
    log global
    mode tcp
    retries 2
    timeout client 30m
    timeout connect 4s
    timeout server 30m
    timeout check 5s

listen stats
    mode http
    bind *:7000
    stats enable
    stats uri /

listen boorvar_cluster
    bind *:5432
    option httpchk
    http-check expect status 200
    default-server inter 3s fall 3 rise 2 on-marked-down shutdown-sessions
    server pgdb1_5432 192.168.56.204:5432 maxconn 100 check port 8008
    server pgdb2_5432 192.168.56.205:5432 maxconn 100 check port 8008
    server pgdb3_5432 192.168.56.206:5432 maxconn 100 check port 8008
/etc/haproxy/haproxy.cfg
Note: Haproxy will check 8008 port of pgdb servers and if it returns 200 status then it will redirect all traffic to the leader. This 8008 port is configured in Patroni.
Start haproxy service on both nodes - using service or systemctl
service haproxy startOnce haproxy is started you can check status by hitting url http://haproxy1:7000

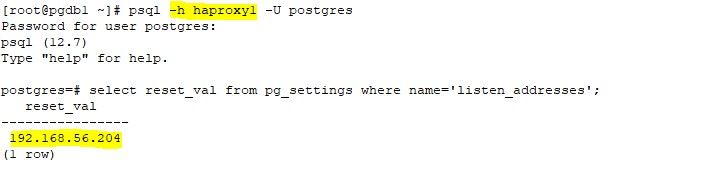
You can see all connections on haproxy:5432 will be redirected to pgdb1:5432, you can check if pgdb1 is the leader or not.
Now try connecting to the cluster using haproxy host, it should get redirected to leader.
Failover Tests
Now you can run some failover tests to check if everything is working fine or not.
Test 1: Primary Node Failure
Objective: Ensure that Patroni promotes a replica when the primary node fails.
Steps:
- Identify the current leader
patronictl -c /etc/patroni.yml list - Simulate a failure by stopping Patroni on the primary node –
sudo systemctl stop patroni - Check if a new leader is elected –
patronictl -c /etc/patroni.yml list - Restart Patroni on the original leader –
sudo systemctl start patroni - Verify that the old leader is now a replica –
patronictl -c /etc/patroni.yml list
Test 2: Network Partition / ETCD Failure
Objective: Ensure the cluster remains operational when a node loses connectivity with ETCD.
Steps:
- Identify the Leader –
patronictl -c /etc/patroni.yml list - Simulate a network partition by stopping ETCD on one node –
sudo systemctl stop etcd - Check the cluster status –
patronictl -c /etc/patroni.yml list - The leader should remain unchanged if other nodes still have ETCD connectivity.
- Restart ETCD –
sudo systemctl start etcd
Test 3: Kill PostgreSQL Process on Leader
Objective: Ensure that Patroni detects a PostgreSQL crash and fails over properly.
Steps:
- Identify the current leader –
patronictl -c /etc/patroni.yml list - Kill the PostgreSQL process on the leader –
sudo pkill -9 postgres - Check if Patroni promotes a new leader –
patronictl -c /etc/patroni.yml list - Restart PostgreSQL on the old leader –
sudo systemctl restart postgresql - Verify the node rejoins as a replica –
patronictl -c /etc/patroni.yml list
Test 4: Manual Failover
Objective: Test the ability to manually promote a replica as the new leader.
Steps:
- Check the current leader –
patronictl -c /etc/patroni.yml list - Manually trigger a failover to a new leader –
patronictl -c /etc/patroni.yml failover - Follow the interactive prompt to select the new leader.
- Verify the failover was successful –
patronictl -c /etc/patroni.yml list
Test 5: HAProxy Failover
Objective: Ensure HAProxy routes traffic to the new leader after failover.
Steps:
- Check HAProxy status –
sudo systemctl status haproxy - Find which node HAProxy is currently routing traffic to –
echo "show stat" | socat /var/lib/haproxy/stats stdio - Kill the leader node –
sudo systemctl stop patroni - Verify HAProxy routes to the new leader –
echo "show stat" | socat /var/lib/haproxy/stats stdio - Restart the failed leader –
sudo systemctl start patroni - Confirm normal operation –
patronictl -c /etc/patroni.yml list
Final Validation
After all tests:
- Ensure data consistency across nodes.
- Verify automatic failovers work as expected.
- Check logs for errors (
journalctl -u patroni -f).
Application Configuration
As we have two HAProxy servers application should be configured in such a way that it should point to both servers, submit the request to available server and if application does not support such case then you need to set up virtual IP which will point to available HAProxy server.
You can handover below details to application team:
Host: haproxy1 (haproxy1.bootvar.com), haproxy2 (haproxy2.bootvar.com)
Port: 5432
Credentials: App user credentials
Connection details for Application
Postgres read-only applications such as reporting, analysis, dashboards can use standby postgres nodes. To configure such type of application you need to create HAProxy listener on different port.
Suhas Adhav
Troubleshooting Common Issues
Patroni Not Starting
- Check logs:
sudo journalctl -u patroni -n 50 - Ensure ETCD is running:
etcdctl cluster-health - Verify Patroni configuration for syntax errors
HAProxy Not Routing Traffic
- Check logs:
sudo journalctl -u haproxy -n 50 - Validate HAProxy configuration:
haproxy -c -f /etc/haproxy/haproxy.cfg
PostgreSQL Replica Not Syncing
- Verify replication user credentials
- Check replication slots:
psql -c "SELECT * FROM pg_replication_slots;"
Things to consider when using Patroni:
- You need to administrate PostgreSQL through Patroni like changing DB parameters, Starting or Stopping of the database.
- Sometimes you need to write your own automation for having out of the box functionalities.
- Patroni is open source library and does not come with enterprise support, you need to depend on open source community for any unforeseen issues or bugs. Although there are managed services available for Patroni.
Best Practices for PostgreSQL HA
- Use at least three PostgreSQL nodes for better failover handling
- Secure ETCD, Patroni, and PostgreSQL with authentication and firewall rules
- Regularly test failover scenarios
- Enable WAL archiving for additional data redundancy
Frequently Asked Questions (FAQs)
- What makes Patroni better than traditional PostgreSQL replication – Patroni automates leader election, failover, and recovery, reducing manual intervention and downtime.
- Can Patroni be used with managed PostgreSQL services like AWS RDS? – No, Patroni is designed for self-managed PostgreSQL clusters.
- What happens if ETCD fails? – If ETCD is unavailable, Patroni continues to operate but cannot make failover decisions until ETCD is restored.
- How can I monitor my PostgreSQL HA cluster? – Use
patronictl listfor cluster status and integrate Prometheus for real-time monitoring. - Can I add more nodes to an existing Patroni cluster? – Yes, configure new nodes with Patroni and register them in ETCD.
Member discussion