100% uptime with AWS Load Balancer and EKS
Achieving zero downtime during deployments is imperative in modern applications, which is one of the driving forces behind the adoption of containerization over traditional legacy infrastructure. While Kubernetes (K8s) offers high availability for applications, the implementation of load balancers can introduce certain challenges, potentially leading to temporary inaccessibility of the application.
The Problem
During a recent migration of our legacy application running on EC2 instance to a Kubernetes (K8s) cluster, we encountered a challenging situation.
While deploying updates for one of our services, we experienced unexpected downtime despite implementing production readiness measures like PodDisruptionBudgets, Readiness Probes, and having multiple replicas. Upon thorough investigation, we pinpointed the root cause of the issue to be at the Load Balancer level.
AWS Load Balancer with EKS
In order to facilitate external traffic access within Kubernetes, whether it's coming from public or private sources, a load balancer is essential. This load balancer ensures the seamless and uninterrupted routing of traffic to the relevant pods. Let's delve into the intricacies of this setup by examining its components and operational processes.
Operational Elements
Here are the components responsible for directing traffic to Kubernetes pods:
- EKS Network Plugin: During the installation of your EKS cluster, you must have selected a network plugin. In our case, we use the VPC-CNI plugin, which allows pods to communicate directly using their unique IP addresses within the subnet.
- AWS LB (Load Balancer): AWS Load Balancer is essential for directing traffic based on incoming request rules. It also supports opening multiple ports and can be linked to Route53 (DNS) entries to ensure consistent domain access for your applications.
- Target Groups: Target groups act as backends for the AWS Load Balancer. Any incoming request to the load balancer is validated against defined rules and then forwarded to the appropriate target group. These target groups, in turn, direct traffic to the backend applications, which may include IP addresses or EC2 instances.
- Kubernetes (k8s) Services: Within a Kubernetes cluster, services act as load balancers on top of pods. A service can encompass multiple pods, and all traffic to the service is served by the pods it encompasses.
- TargetGroupBindings: Target group bindings establish a mapping between services and their corresponding target groups. It ensures that the IP addresses of pods behind a specific service are correctly updated within the specified target group.
- AWS LB Controller: The AWS Load Balancer (LB) controller is a process or pod within the Kubernetes cluster. It manages all target group bindings, mapping services to the pod IPs behind them within the respective target groups, ensuring efficient traffic routing.
In simple terms, the AWS Load Balancer controller and TargetGroupBinding objects work together to help the AWS Load Balancer efficiently direct traffic to the appropriate pods, ensuring smooth and reliable operation.
Operation of the Entire Setup
With the components mentioned above, the AWS Load Balancer efficiently directs traffic from external sources to Kubernetes pods. If you intend to grant public access to specific web services, this entire process hinges on this setup. Want to delve deeper into how it works? Let's explore.
- When we deploy a service, it results in the creation of defined replicas of pods, each of which acquires an IP address from a pool of available IPs within the subnet.
- Kubernetes services are established on top of these pods to ensure ongoing connectivity, even when new pods are introduced. It's like DNS service within Kubernetes cluster.
- In cases where other applications within the Kubernetes cluster need to access these pods, they can do so via the service layer. Essentially, each service acts as a gateway to the respective pod's IP addresses.
Kubernetes Services are assigned internal IP addresses that cannot be accessed from outside the Kubernetes cluster. However, pods are accessible because they receive IP addresses from the pool of subnet IPs.
- However, if you wish to access this service from outside the Kubernetes cluster, you need access to these specific IP addresses. The load balancer plays a crucial role in making it feasible to route traffic to the pods from external sources.
- To facilitate this, a target group is created, which contains the IP addresses of the service and is then associated with the load balancer, working on defined routing rules.
- The TargetGroupBinding is responsible for mapping the service to its corresponding target group. The AWS Load Balancer controller ensures that the IP addresses behind the service are kept up-to-date within the designated target group.
- As a result, you can access the service based on specific rules. For instance, if the host header in the request is
service1.appthe traffic will be directed to the designated target group.
Downtime Explained
We achieved a successful migration of our application, taking all necessary precautions. This application was handling thousands of requests per second routed through a load balancer. However, the following day, during a routine deployment of this application, we experienced an unexpected downtime of approximately 30 seconds, leading to a significant increase in request failures. Our investigation began by examining readiness probes and aspects related to how the application handled requests, but no conclusive issues were identified.
To replicate the scenario and isolate the root cause, we devised a new deployment featuring Nginx. We aimed to conduct an upgrade without incurring any downtime. We created a Python script, as detailed below, to monitor the situation. The script's purpose was to record downtime instances and provide continuous requests to the Nginx server under normal conditions.
import requests

url = "http://devops-test.app"
while True:
  try:
    response = requests.get(url)
    if response.status_code != 200:
      print("Error: Endpoint is DOWN. Status Code:", response.status_code)

  except Exception as e:
    print("Error:", e)
Script to test endpoint
By utilizing this script, we pinpointed a series of requests generating 502 and 503 response codes. This discovery prompted our investigation into the load balancer. Initially, our primary suspect for the 502 errors was the AWS Load Balancer (LB). We conducted a thorough examination of the entire deployment process, including IP registration and the removal (draining) of old IPs, and made a significant observation.
Subsequently, we delved further into the internals of IP registration and deregistration processes within the AWS Load Balancer, focusing on the newly created pods.
IP Registration flow - The process of registering new IPs follows a straightforward path. Whenever a new pod becomes operational, the AWS Load Balancer (LB) controller records an entry for this pod in the relevant target group. Once the target is verified as healthy, traffic is directed to the respective pod.
IP De-registration flow - In contrast, the IP de-registration process unfolds when Kubernetes sends a termination signal (SIGTERM) to a pod, signaling its shutdown. Upon receiving this signal, the AWS LB controller promptly initiates a signal to the AWS Load Balancer, commencing the drainage process for the affected pod."
In our observations, we noticed that even though an old pod from a service was terminated within a matter of seconds, the AWS Load Balancer (LB) continued to include this pod in the draining process. As a result, it briefly forwarded some traffic to the pod during the initial few seconds before the complete draining process could take effect. Essentially, the pods were terminating so swiftly that they outpaced the draining process.

In our analysis, we observed that old pods terminated before the AWS Load Balancer (LB) could complete its draining process.
How to Avoid Downtime on LB?
Upon identifying the issue, we embarked on a solution-finding mission and discovered that others had encountered similar challenges. Drawing inspiration from their experiences and existing solutions, we devised a plan involving the implementation of a preStop hook. This hook offers the pod a brief window of time before termination.
Our approach involved combining the use of terminationGracePeriodSeconds and a preStop hook, along with a sleep command. This combination ensures that the pod is granted additional time before Kubernetes controller completes the termination process. During this interval, the AWS LB controller can efficiently drain the IP address from its target, resulting in a seamless, zero-downtime transition.
    lifecycle:
      preStop:
        exec:
          command:
          - /bin/sh
          - -c
          - sleep 60
preStop hook for the pod
We pay close attention to the timing of the terminationGracePeriodSeconds and the sleep time. It's important that the terminationGracePeriodSeconds (set to 90 seconds) is longer than the sleep time (set to 60 seconds), allowing for a safe shutdown.
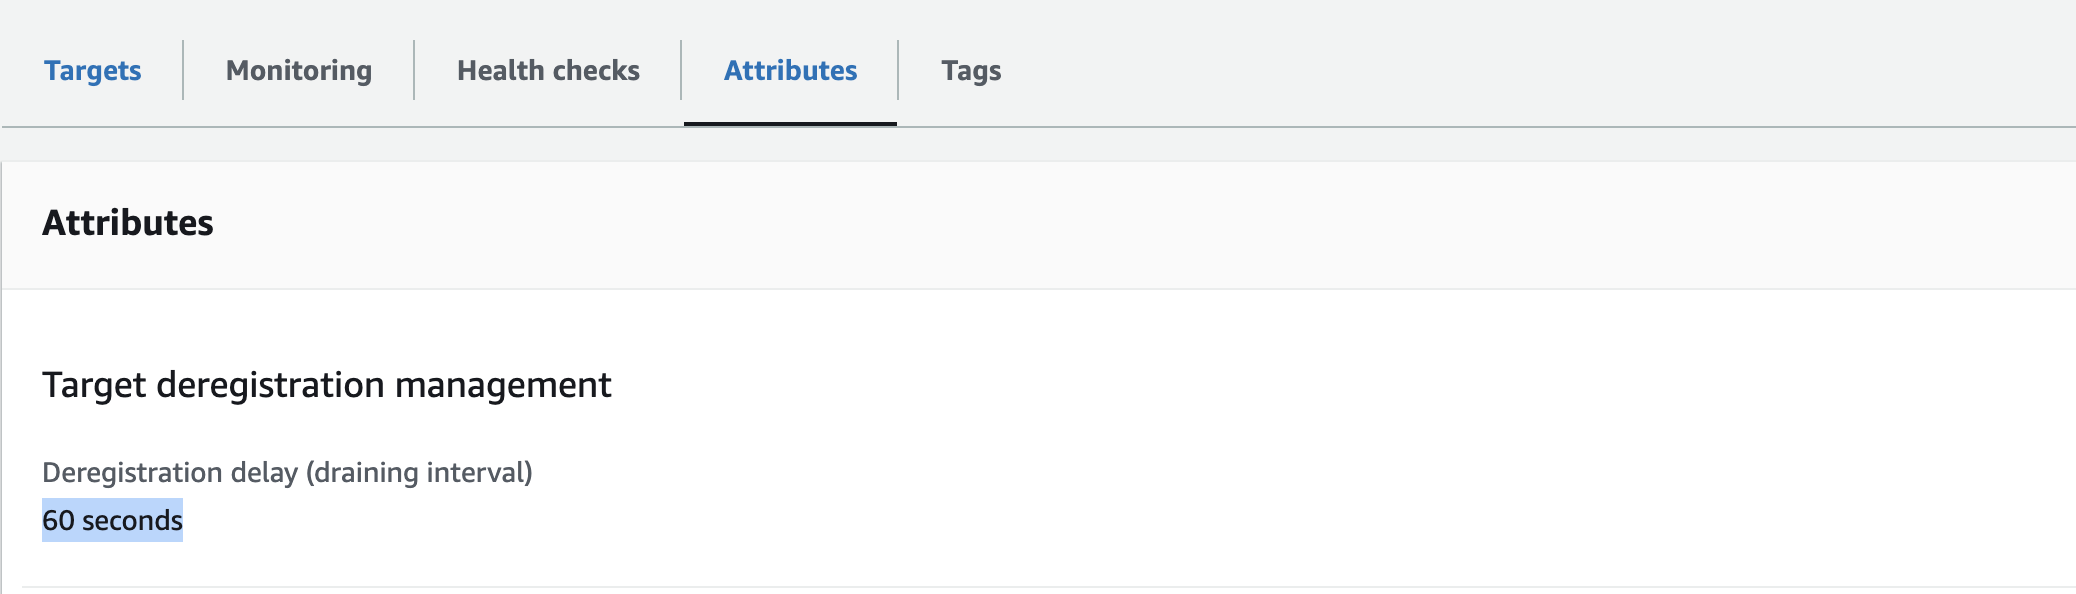
Furthermore, we ensured that the draining interval in the relevant target group was set to match or be less than the sleep time, as demonstrated below.
Summary
Draining existing targets and established connections within a load balancer takes time, and it's an issue that has been raised in the AWS LB forum. While there isn't a one-size-fits-all solution, we can enable applications to work smoothly by allowing them some additional sleep time.
This approach ensures a safe and gradual draining of connections and targets, effectively resolving the issue in many scenarios. It's crucial to fine-tune parameters like sleep time, terminationGracePeriodSeconds, and draining interval to align with your application's specific requirements. For further insights, please refer to the resources below.

Member discussion